Vim Grammar
Intro to Vim's Grammar
Update: Vim Grammar diagram used during my talk at Vim London available here
A grammar is a set of formation rules for strings in a formal language. The rules describe how to form strings from the language's alphabet that are valid according to the language's syntax and structure. A grammar does not describe the meaning of the strings or what can be done with them in whatever context, only their form.
Paraphrased from Wikipedia
Alphabet
Vim's alphabet is formed of all the keys and meta-keys on the keyboard. This
includes combinations of keys pressed together, e.g. Ctrl-A is its own entry in
the alphabet as opposed to only a and Ctrl being defined in the alphabet.
Let's define some of our alphabet mappings:
Operators
Operators function as the doing words in our grammar. They define how are text will be processed.
Main Operators:
d - delete
y - yank
c - change
There are around 8 other useful operators, however these 3 comprise most of the operations we will ever do in Vim.
Motions
Motions are the keys associated with moving around in Vim, whether thats to move to the end of word or back to the start of the document, these are all motions.
There are LOTS of motions and I couldn't hope to cover them all here, however here is a some subset for our example alphabet.
Common Motions:
h,j,k,l - left, down, up, right
w,W - to start of next word or WORD
b,B - to start of previous word or WORD
e,E - to end of word or WORD
$   - to end of line
^   - to start of line
First Rule
With this simple starting alphabet we can form some simple commands using a
combination of operator and motion.
d$ - Delete to end of the line
yW - copy till end of WORD
cE - delete till end of the word and go to insert mode
That is our first rule!
rule = operator motion
The 3 words we see above are referred to as symbols in a grammar. The left hand side can be replaced with the right. We can now add more functionality to our language by adding more operators or motions.
The rule definitions are similar to regular expressions. Our rules have to match
a certain pattern of characters. In our rules we will also specify where we can
have repetitions of characters similar to regex +, {x} and *, which we will see
later.
Expanded First Rule
Let's expand our alphabet with another symbol.
Repetition. If we want to repeat our rule above a certain number of times we add a number in front of the operator.
The form this can take:
repetition = 1..9 { 0..9 }
This formal definition says a repetition starts with a character between 1 and 9, and continues with any number of number characters including zero. In other words the numbers greater than zero.
THEY ARE CHARACTERS, NOT NUMBERS. This is because we are defining our symbols from raw character strings.
Let's expand on our original rule:
rule = [repetition] operator motion
The [] square brackets in this notation mean that this symbol is optional. So we
can optionally have a repetition as the first symbol of the rule.
3dw - delete a word 3 times.
We can however also say:
d3w - delete forward for 3 words.
Let's add this definition to our rule:
rule = [repetition] operator [repetition] motion
We could even have:
3d5w - delete forwards 5 words 3 times
Make sure you understand where the repetition is being applied. This last
command is 3 times delete 5 words forward and the first repetition applies to
the whole command, it is more like - do this next operation THIS many times.
This rule is already looks a bit messy. Let's move the repetition from the rule definition to the operator and motion definition.
rule     = operator motion

operator = [repetition] ( d | c | y )
motion   = [repetition] ( h | l | j | k | gg | G | ... )
Text Objects
Grammar definition:
text-obj = modifier object
Let's define what a modifier is:
modifier = a | i
A modifier is defined the keys a or i. The bar | is our choice operator
here, we have to choose at least one of the symbols in the choice group.
a - generally means around our object including some whitespace or
    surrounding symbols.

i - usually means inside of the object, usually excluding whitespace and
    surrounding symbols.
First object:
w,W - word object, not to be confused with the movement!
In context this has to be used with the a or i modifiers, just like any
other text object, and it will affect the whole word/WORD regardless of cursor
placement.
When daw is used and the cursor is in the middle of a word, it affects the
whole word and the leading whitespace. This is different and must not be
confused with the behaviour of dw which is delete till.. end of
movement.
More Objects:
s - sentence. This is a conitiguous set of words which are terminated by a
    sentence terminator, generally a fullstop or two line breaks. Vim
    handles multi-line sentences well.

p - paragraph. New line seperated block of text.

[ ] { } ( ) " ' ` < >
    All of these characters work in the same way. These characters specify text
    objects which are wrapped by the corresponding character.
If you wanted to delete your function arguments inside of function("first", "second",
"third") and your cursor was somewhere in the middle you can call:
di( or di)
This leaves us with function() with our cursor inside of the brackets. The
angle or direction of the bracket does not matter.
da( or da)
This will leave us with function with our cursor at the end of the word.
If we replaced the round brackets with square or curly braces, we can swap
the object specifying character, ie ( to {.
function()
{
    var x = "Y";
    // Vim will even work on multiline objects!!
    // Great!
    var y = "X";
    return x+y;
}
Typing di{ or di} or even diB will leave us with a nice empty function
with our cursor on the bottom bracket.
function()
{
}
Second Rule
We can combine our text objects using one of these two modifiers and an operator. This is our next rule.
rule = operator modifer object
Ideally we need to encapsulate this idea into another rule.
text-object = modifer object
We need to define these symbols more formally.
object      = w | W | p | s | ( | ) | { | } | [ | ] | " | ' | `
modifer     = a | i
Let's add an optional repetition:
text-object = [repetition] modifer object
This gives us our simplified rule:
rule = operator text-object
Back to One Rule
We can combine this with our other rule:
rule = operator ( motion | text-object )
Our composite rule now covers both text object manipulation and manipulation using motions.
More Rules
To create a full grammar we would need to specify all of the commands and there are many corner cases.
We should mention a few other rules in our Vim grammar. When a operator is called twice it produces its effects on the entire line.
dd - delete whole line
yy - yank whole line
cc - delete whole line and go to insert mode
A new rule for this:
rule = duplicate-op
We can repeat this command too:
rule = [repetition] duplicate-op
Simple. We can use a motion by itself to move around the document.
rule = motion
We can also have a general purpose rule for movement. We can see how we are now building up our grammar for Vim and how this can define all our commands we will ever use.
Other rules
selection-manipulation = selection { motion | text-object } ( selection-operator | operator )
Curly braces specify an optional repetition, similar to the * operator in regex, it
allows any number of matches including zero.
[repetition] insert-mode {chars} exit-insert
[repetition] colon {chars} exit-command
[repetition] operate-special
[repetition] selection-operator
[repetition] search-specify
More Resources
If you're still confused or want to learn more about Vim's grammar the first stop would be Vim's help!
:help motion
:h operator
:h text-objects
There are some other great resources available:
Learn to speak Vim – verbs, nouns, and modifiers
The Grammar of Vim
Here is also a very good Stack Overflow answer to a question on Vim; it is well worth a read and covers Vim's grammar is a way which really helped me understand when I first started Vimming. - Grok with Vim
Refactoring Java With Eclipse
The project I having been working on for the last year or so was first written in around 2004 meaning it was written for Java 1.4, it had a lot of things wrong with it. I want to show you several of the techniques I used in refactoring this project using Eclipse.
These tutorials will come in several parts, this first part addresses using regular expressions to refactor multiline logging.
I will be using Eclipse Juno for this but I believe almost all of the techniques I use are available on 3.x. You will need a basic understanding of regular expressions, if you don't checkout out this helpful guide, it covers .NET but Java uses exactly the same regex syntax as .NET so don't worry.
This shouldn't need to be said, but if your doing large refactorings like this one you should always have Revision Control system like Git in place. It enables you to quickly roll back any changes if unneeded or bad and track the changes that you make.
The logging was in a bad way. It was a sort of roll your type of logging that required a Singleton to access the logging which then used the Java logging methods and it really wasn't very good or useful. This was also one of the hardest tasks in my refactoring. After researching logging implementations I decided upon using SLF4J - Simple Logging Facade for Java, it creates a nice decoupling between the logging which gets invoked and the implementing code.
Anyway, to use SLF4J you create a logger object for each class or for a collection of classes.
Logger logger = LoggerFactory.getLogger(ClassToRefactor.class);
Now we need this logger field in every class that needs logging. Considering there were about 1000 classes in total and about but 600 use logging, this would be no simple task to do by hand. My first few attempts were with using sed, however they weren't very successful, however you could use the regular expressions I use here and modify them for sed. It was also a lot safer to use Eclipse, as I could roll back all my changes with one undo!
This is the first regex (regular expression) I used to find all my class definitions in all my Java files.
public (abstract)? class (\w+)\s\{\n
This regex found any public or abstract classes, we can also expand this to cover private classes.
p(ublic|rivate) (abstract)? class (\w+)\s\{\n
This regex will not cover any declarations with an extends or implements keyword in though, we need to expand to cover those case too.
p(ublic|rivate) (abstract)? class (\w+) (.*)?\s*\{\n
The simple addition of (.*)? covers any possible declarations after the class
name.
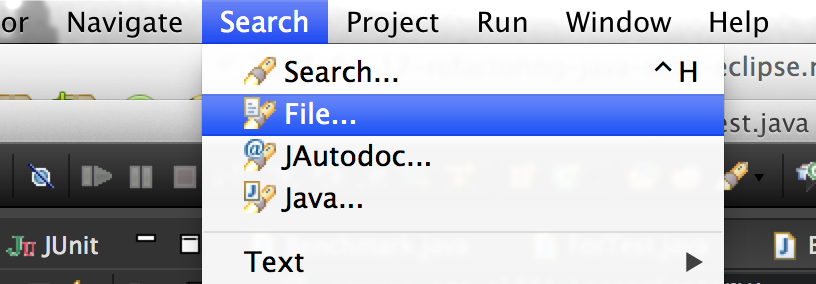
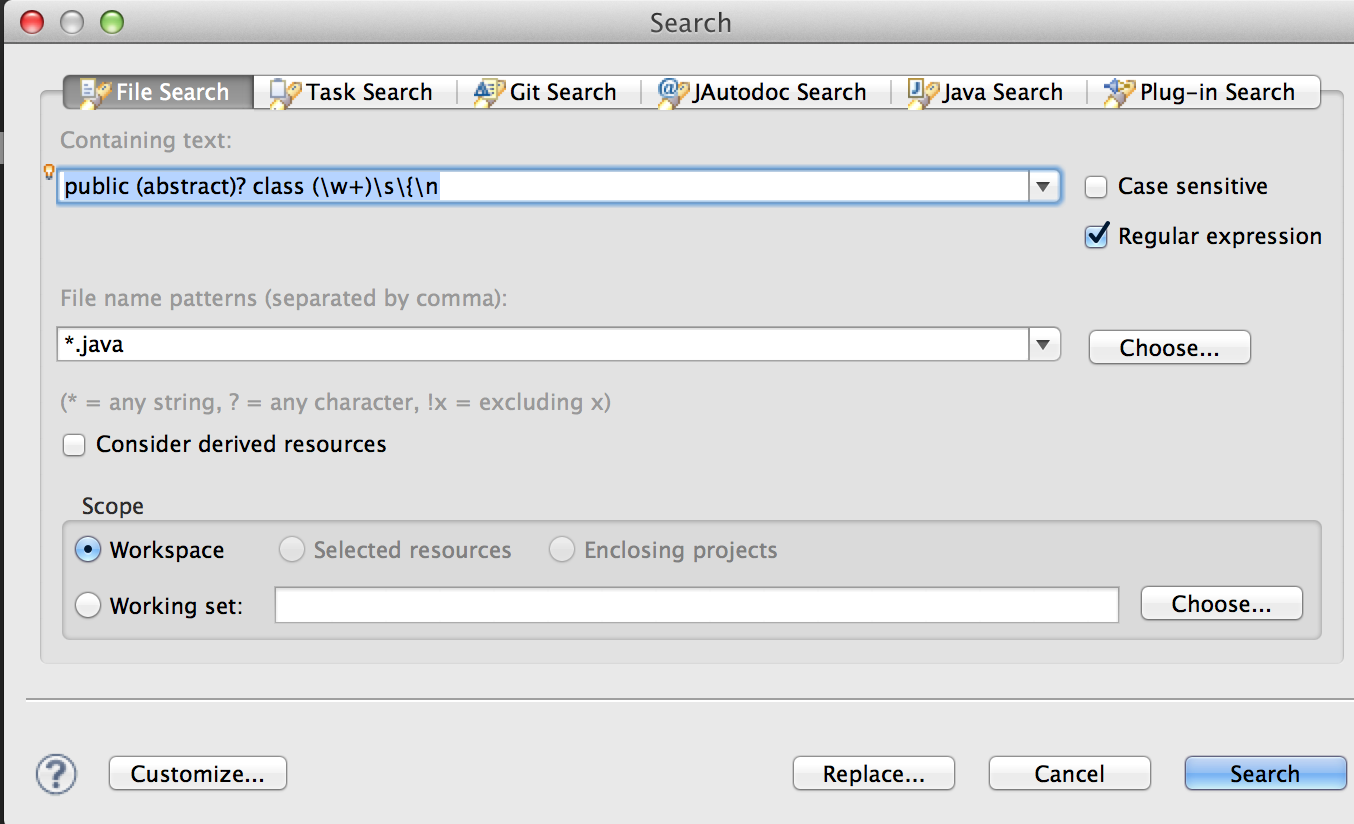
We then can use this class definition and tack on a field definition. We then use Eclipse's replace function using this regex. Make sure you have ticked the box 'Regular Expression', then click replace. My replace expression was:
\0\n\tprivate static final Logger logger =
LoggerFactory.getLogger(\2.class);
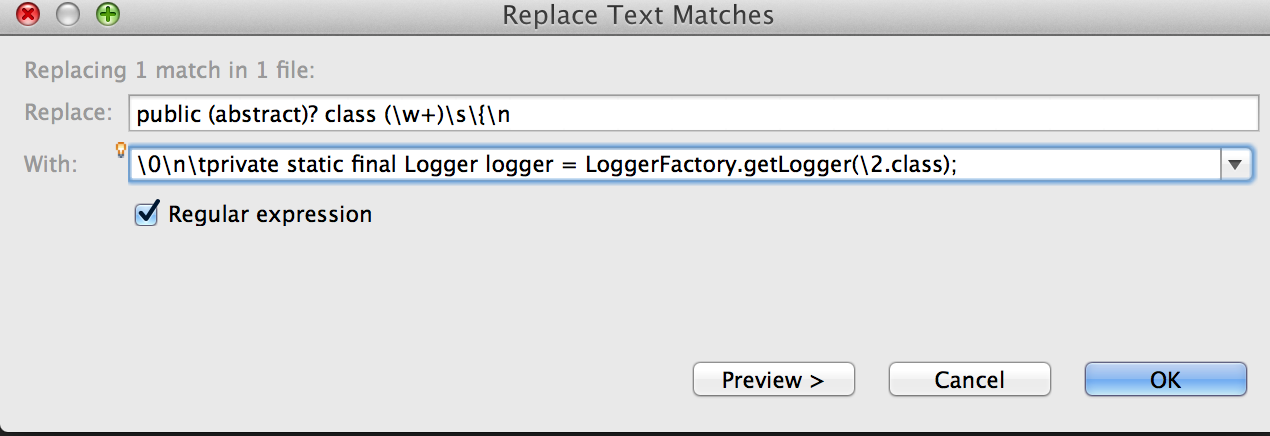
The \0 is the entire match, so we first want to put back the class definition,
then add a new line and a tab \n\t. Next is the field declaration of the
logger, and we want to put back the class name as the parameter for
getLogger(), the class name has been captured in group 2 \2.

Once we hit replace, most of our classes should now have this
field declaration in and if you give Eclipse a chance to refresh it should show
us an error on every single class we added the field to! This is expected, as we
haven't added the imports for Logger or LoggerFactory. There are two ways we
could do this through Eclipse.
Use Eclipse's
Organize Importsto go through all the Java files and try and automatically fix the definitions. This may cause issues if you have multiple libraries using the same class names, and Eclipse provides a nice pop-up to solve this.Another regular expression! This time we want to match the top of the file and add our imports. This can be done by matching the package declaration and appending below it. This will avoid the clashing class name on organize imports completely.
The search regex:
^package .*;
The replace regex:
\0\n\nimport org.slf4j.Logger;\nimport org.slf4.LoggerFactory;
This regex is similar to the last one where we search for the class definition
and replaced it with the line we matched. This time we match the package
declaration: package com.yourcompany.... and replace it with itself and our
import with a new line between. Refresh Eclipse and all your errors should
disappear!
Note: This won't work if you have a default package for your project, ie you have no package declaration
Next we need to update the old logging functions to use the new logging function. Most of the logging calls were wrapped around a horrible logging if statement to check if logging was active for that level and then writing to the log if the log level was active. There was a check for different levels which was I could utilise to create calls to my new logging levels.
This is what the old logging calls looked like:
 public void method() {
        if (StaticLogger.isLevel(LogLevel.CUSTOMER)) {
            StaticLogger.log("Starting method");
        }

        int ans = otherMethod();

        if ( StaticLogger.isLevel(LogLevel.WARNING) ) {
            StaticLogger.log("Finishing method got: " + ans);
        }
    }
The regex we need to match this is fairly complex, as we need to capture the log message and the log level.
if\s*\(\s*StaticLogger\.isLevel\(\s*StaticLogger\.WARNs*\)\s*\) \{\n\s*StaticLogger\.log\(\s*([^)]*)\);\n\s*\}
We can see the structure in the regex but we will replace LEVEL with our
desired level to replace. Make sure you note the excessive use of \s* the
optional character class for any whitespace, any number of times. This is
littering our regex to make sure that every invocation of the logging statement
is captured with varying levels of whitespace. There are a few \n? optional
new lines character clases in the regex, these are in case our call has been
split on to multiple lines.
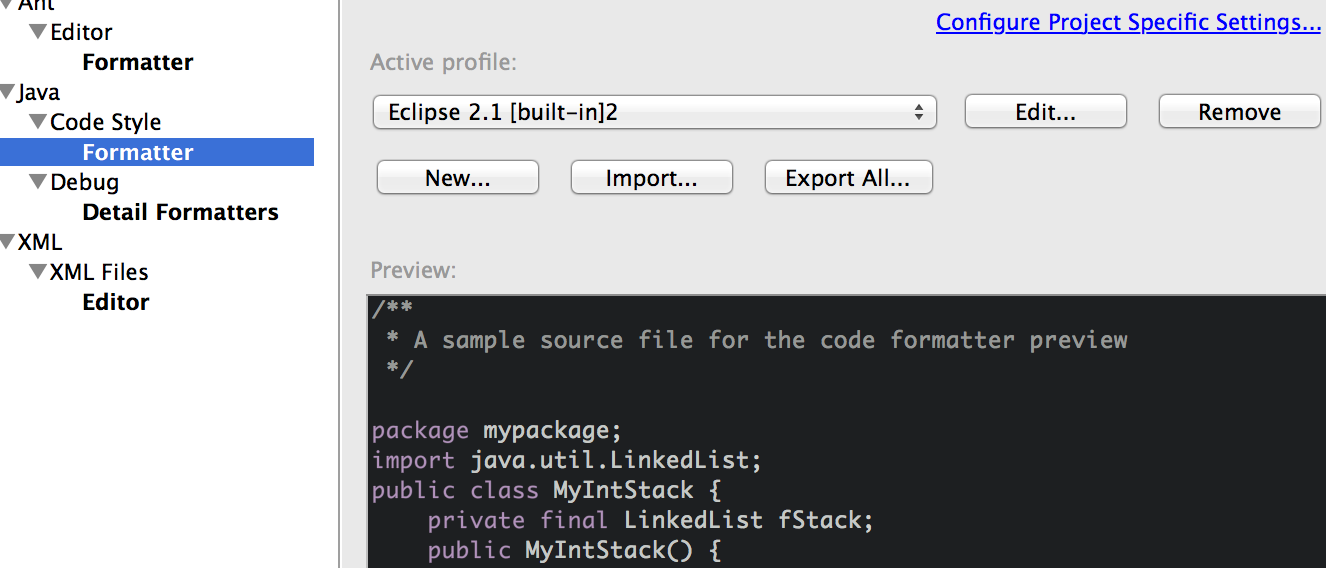
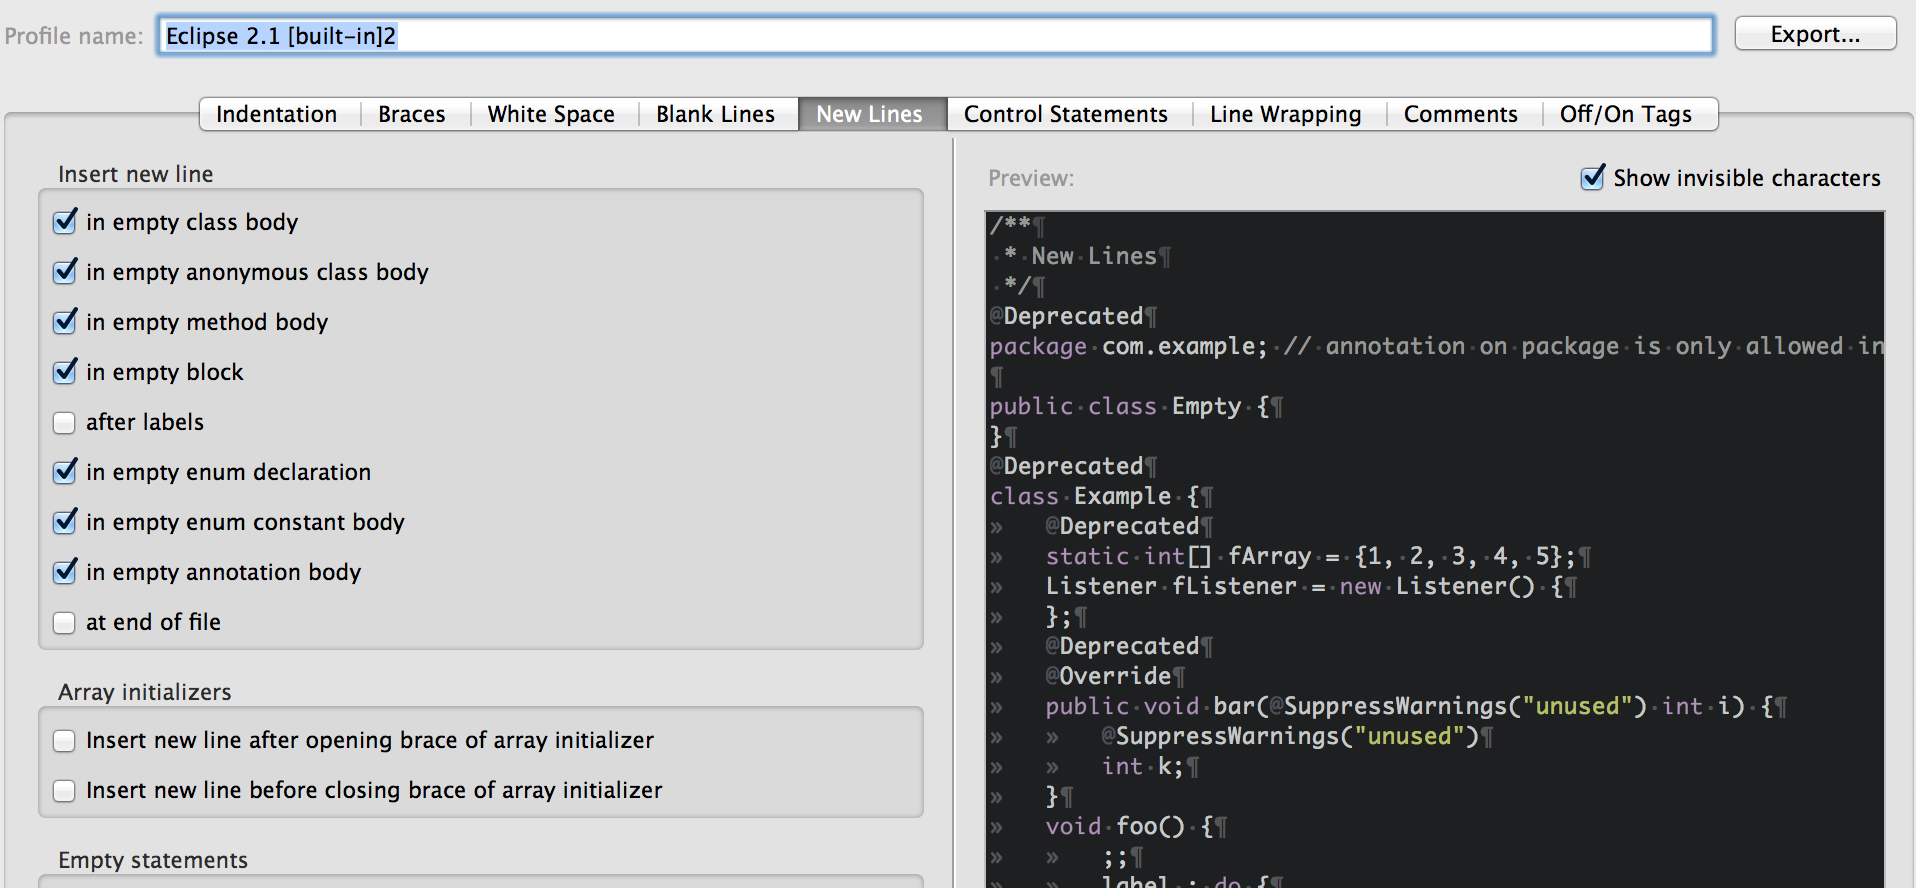
We can actually get rid of most of these just in case calls by formatting our all of our code correctly first. To do this you must first go into the option and creating a formatting profile. Eclipse already as a built in formatting profile which we can use, however I like to make my formatting very strict and we can do this by setting the options in the formatting profile. A new profile must be created if you want to generate your own formatting profile, you can't just override the default one unfortunately.
Now we can call for a project wide update of formatting. This will restructure and correctly indent, add or remove whitespace etc and do all of the other formatting constraints you set up in your profile.

Once we have formatted all of our source code correctly we can now be more
certain of our regex and can probably remove some of the unnecessary whitespace
character classes such as \s* and \n?. We easily test our our regex using
the same Eclipse file search feature, just don't click replace click search
instead!
Once we are certain of our regex we can execute the replace. Our replacement regex will look nice and simple:
logger.warn(\1);
Where we can replace 'warn' with the level we are replacing.
Brilliant, now that horrible logging method:
    if ( StaticLogger.isLevel(LogLevel.WARNING) ) {
        StaticLogger.log("Finishing method got: " + ans);
    }
Will be transformed into:
logger.warn("Finishing method got: " + ans);
Once we have gone through all the different log levels in the old code we can remove the singleton that was being used for logging, this will show all the places where the regex has missed cleaning up the old logging methods. There were certainly a few missed cases when I tried this on my legacy project some cases, but these were easy to find now as Eclipse gave a nice list of the problems. It enabled me to either refine my regex and use the same process again or just go in and edit the code myself.
Part two legacy code refactoring will be available in the next few weeks.
Tom
How This All Got Started
This is a quick technical overview of how I setup this blog and how easy it can be to start your own!
Jekyll
First off, this blog is based on Jekyll which in its own words "is a simple, blog aware, static site generator." What this really means is that it turns some simply formatted files in into full html pages for you. It does also have a built in web server, but your not really meant to use this for a full site deploy, only for testing.
This blog is based off Jekyll-Bootstrap which makes the process of setting up this blog even quicker!
To get started with Jekyll and Jekyll-Bootstrap, you will need Ruby Gems installed which is essentially a package manager for ruby programs.
If you want free hosting of your blog you will also need a github account and git installed.
Getting Started
The first thing I did was go through the instructions on the Jekyll-Bootstrap page, which told me to:
- Create a github repository, called USERNAME.github.com.
Where you replace USERNAME your github username with. This is important as once you create this repo github realises this is a Jekyll blog and turns this a github pages site. Very nice!
Then:
git clone https://github.com/plusjade/jekyll-bootstrap.git USERNAME.github.com
cd USERNAME.github.com
git remote set-url origin git@github.com:USERNAME/USERNAME.github.com.git
git push origin master
Github will then automatically turn your site repo into a Github Pages site. This may take a few minutes to update so be patient, and it will take a few minutes to update every time you push your changes.
You can actually view all the source from this blog here.
Now there are some very good resources already on getting your site up and running, and adding new posts so I recommend checking out the Jekyll documentation before going any further.
Running Jekyll and Customising
Now you will probably want to test your site locally before pushing you changes to the live site. This can be accomplished very easily using Jekyll.
jekyll --server --auto
Make sure you are in the root of your repository when you run this. This will
start Jekyll running a web server on
http://localhost:4000/. As we have specified the
--auto option to Jekyll, it will automagically compile any changes to our site
and rehost them.
If you now browse to http://localhost:4000/ you see a very generic looking blog, with a nice intro to using Jekyll-Bootstrap and Jekyll. However it doesn't have a nice blog name or any indication of whos blog it is! Lets change that.
On you file system you will need to browse to your repository and open up _config.yml in your favourite text editor. Mine is Vim, and I will certianly discuss that later...
title : Blog Title
tagline: computers. commandline. java. blog.
author :
  name : Tom Cammann
  email : your.email@here.com
  github : takac
  twitter : tea_sea
  feedburner : feedname
Go ahead and change this to you own information and blog information. You can also setup Google Analytics, Feedburner and Disqus with your Jekyll blog, however this is more advanced stuff.
Once you save your details in there, you should be able to browse to localhost:4000 again and view the updated changes.
Now we have setup the config correctly we can modify our landing page, or index
page, which is set to index.md. Again open up your text editor and start
changing! The format of the files your Jekyll blog will use is based on
Markdown which allows you to
write using an easy-to-read, easy-to-write plain text format, which is then
converted into HTML by Jekyll. Again after you have made some changes to
index.md and you have saved your changes you can view the rendered page by
browsing to localhost:4000.
First Post
Now you've customised your own front page it seems like a good time to have a
go a your first blog post. Each post needs to go in the _post directory. The
filename is also very important. The filename must follow the convention:
yyyy-mm-dd-title-of-post.markup, eg. this file is called
2013-01-11-how-this-all-got-started.md. The markup as the file extension
specifies what markup language this file will be written in. I like markdown,
and I have used the markdown extension .md so I can use it.
Create a new file: _posts/2013-01-11-my-first-post.md
You must start your post with a yaml header.
---
layout: post
description: How I Created this Jekyll Blog
tags: [intro, beginner, jekyll, tutorial]
---
The layout key is the most important line. It specifies what layout template to
use when building the HTML page. All the layouts available for your site are in
the _layouts directory. This means you can also customise any of your layouts
at anytime and it will update the other posts using that layout.
The tags and description lines just specify some extra metadata for your site. They aren't necessary but they add helpful metadata which really helps for SEO.
After the yaml header in the Jekyll-Bootstrap posts, there is a strange
looking line:
This line is in the Liquid Markup syntax. It is
another markup language used within any of the pages you create that are
processed by Jekyll. This line tells Liquid to directly include the contents of
the file JB/setup. This file can also be in the same format, using Liquid
tags {% ... %} .
The rest of the content of your must be in your specified markup language, but you can include Liquid markup at any point in the document too. Lets create a header for our post, and some text underneath.
## My First Header ##
The ## signals a H2 style header, if you used one # it would be an H1 style
header, and if you used 3#s it would be an H3 style header. This text will
come out as a standard text body.
Great now we have the started our blog post, we should save and see what this renders too. If you haven't already, lets start Jekyll and go http://localhost:4000/. Jekyll can be started by running:
jekyll --server --auto
In the root directory of your blog, ie in the same directory as the _posts and
_layouts directories.
We should now see a nice clean web render of your really simple Markdown post. Great!
Additional Resources
Hopefully this helped get you started blogging with Jekyll. There are lots of other great resources out there to help you get started. Make sure you checkout the Jekyll documentation and the Jekyll-Bootstrap documentation, they were both helpful for me when starting this blog.
Another invaluable resource is the sites that other developers have created using Jekyll. The source code for many of the sites that use Jekyll are listed here. Go check them out and get inspired!
Tom